Add Wi-Fi to Old Appliances for Fun and Automation
You don’t always have to replace appliances to be able to connect and automate them.
Despite being told, perhaps something that I didn’t fully digest until later on in my home automation journey is that most of the value is in the automations. The clue is in the name, but the real power is not in being able to turn things on and off from your phone whilst you’re away from home, but in building in some basic smarts so that a device knows what to do without you having to tell it. That way you don’t have to think about it, and stuff just does what it needs to. As we talked about in why you should care about home automation, this depends on the network effects of building up your system — that is to say that as you add more components, the combinations of interactions available between those components and thus the potential power of the system increases exponentially.
We’ve taken an appliance from being entirely unconnected to one that knows exactly when the best time of day to run is for the cheapest electricity, powers on and starts automatically, and then powers off again when it’s done.
That being said, of course thinking about that leads to looking around the house with a view that highlights appliances and basically any powered item that isn’t connected, thinking of the utopian future and all the cool shit you could do if only they were. To help address that we’re going to work through an example of connecting an old appliance. I’ve attempted to explain the techniques I used for one particular appliance in a generic way without being overly specific to one specific make and model, but it’ll be up to you to figure out the details and apply it to your situation as each appliance will be different.
This is going to be a long one, but let’s dive in.
Identifying something hackable
If you’ve immediately gone and spotted some appliances that could be a potential candidate for automation, the next step is assessing how easy that modification is going to be. Some things to look for which may identify an easier job are:
Mechanical, ‘clicky’, momentary buttons (as opposed to latching switches, rocker switches, touch-based switches or screens)
No reliance on controls that require visibility of labels (for example a rotary knob that endlessly rotates so you can’t know what option is selected without looking at it)
Repeatable processes (the same pattern of button presses every time the appliance is started or turned on)
Availability of a low voltage (e.g. 5V DC) power source internal to the appliance
All of these things vary massively depending on type of appliance, manufacturer, model, and similarly it’s not always a case of yes it can be automated or no it can’t. There may be some situations where part of the process can be automated and part remains manual, but that could still provide value.
In addition, the proposed appliance needs to be within range of your WiFi network. WiFi is easier to work with as compared to cabled ethernet since it means we don’t need to provide a route into the appliance for the cable and find a route for the cable from the appliance to a router or switch.
The sample appliance
I thought it best to go through this process with an appliance in mind as an example, so let’s take a look at my dishwasher.
I am trying specifically to make this post about the concept of connecting an older, unconnected appliance, and so the specifics of implementation in this unit matter less than the general ideas, but on the very unlikely chance you have the same unit, this is a Comfee KWH-TD602E-S. I assume the ‘-S’ means silver…?
In regards to the list of requirements above, this unit has 4 mechanical, momentary buttons. One to power on the unit; it’s really already ‘on’, so this is more of a ‘wake’. A second to set the delay time, a third to choose the programme and a fourth to start/pause the programme.
In general use, the machine always starts up set to the programme most commonly used (‘eco’), and so to start a cycle, I am usually pressing ‘on’, then shortly afterwards pressing ‘start’. We don’t need no delay anymore so that button is out, and there’s no way to know automatically if we need to choose a different programme or not so that’s out as well. Overall, it seems pretty easy to automate, so let’s have a crack at it.
Finding a power source
Firstly, exercise caution when opening or taking apart appliances. If you’re contemplating trying this I’m going to assume you know what you’re doing when it comes to devices powered by mains electricity.
This isn’t a deal-breaker, but if you can find a source of low voltage, e.g. 3.3VDC or 5VDC within the appliance, it saves having to run a cable from a separate external supply to provide power to the extra circuitry we’ll be adding.
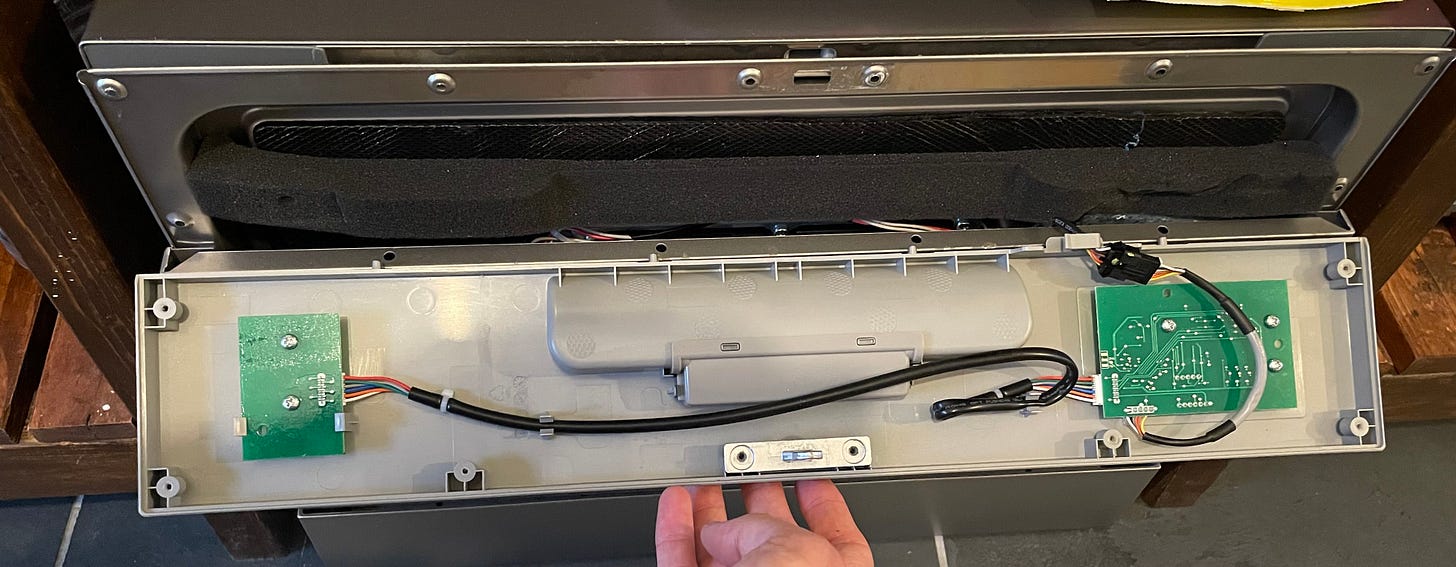
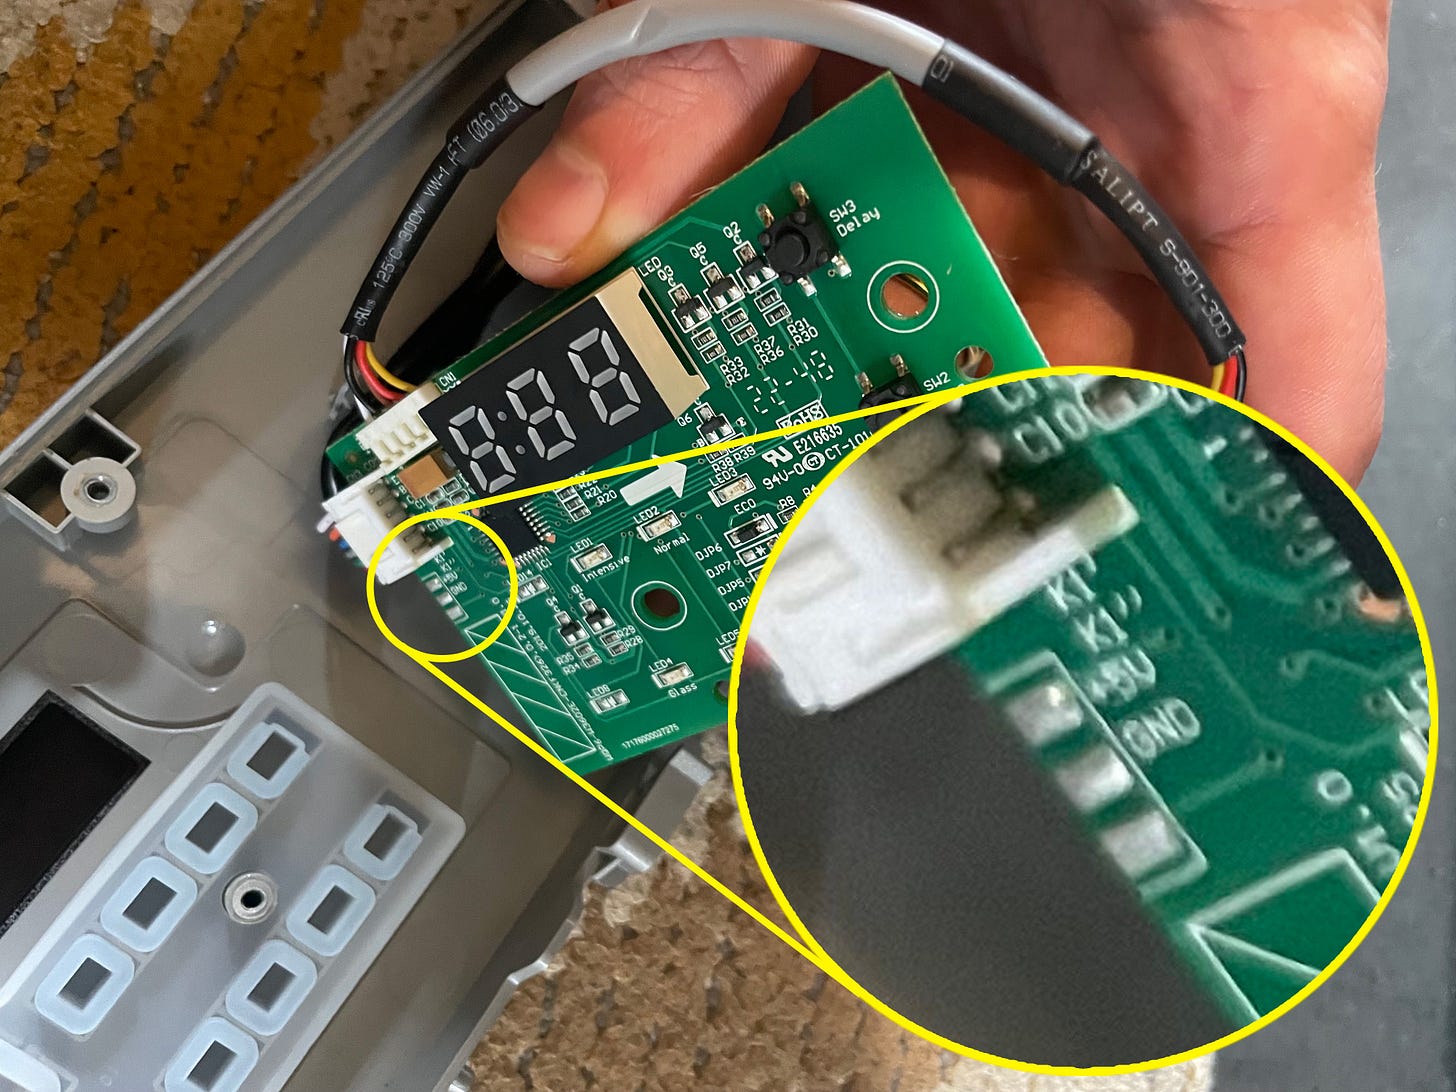
With the Comfee, things turned out to be pretty easy! I took apart the front panel of the machine to examine the buttons and lo and behold, what did I find? Firstly, it looks like the entire front panel is low-voltage. There are no mains components here, which is handy. Secondly…
A handy +5V and ground connection! This is perfect! A quick test with a multimeter confirmed that it was indeed what it said and it was active as long as the machine is plugged into the mains, not only when it’s “on”.
In this case I had it easy, the power supply was there, labelled, and exactly where I needed it. This absolutely isn’t always going to be the case in every appliance, but I’d say these days it is quite likely that the front control panel is driven by a microcontroller which will be operating from a low voltage supply.
If there’s nothing labelled, the only way to find something may be to probe stuff with a multimeter. Some techniques:
Look for the red and black wires. It’s a reasonably well established convention to use red wire for positive DC power, and black for negative DC power.
Look for ground planes - sometimes circuit boards have empty space filled with a conductor connected to ground.
Identify other components, look up their pinout online and find which pin(s) connect to power.
If you can’t find power, the alternative is to bring a cable in to supply power from outside the appliance, for example, a 5-volt plug-in supply. Not difficult, just not as easy and tidy as using a supply already available inside the machine.
Pressing buttons without pressing them
Since we’ve now got 5VDC power available, the next thing to figure out is how we can press buttons without having to go into the room and use eyes and a finger.
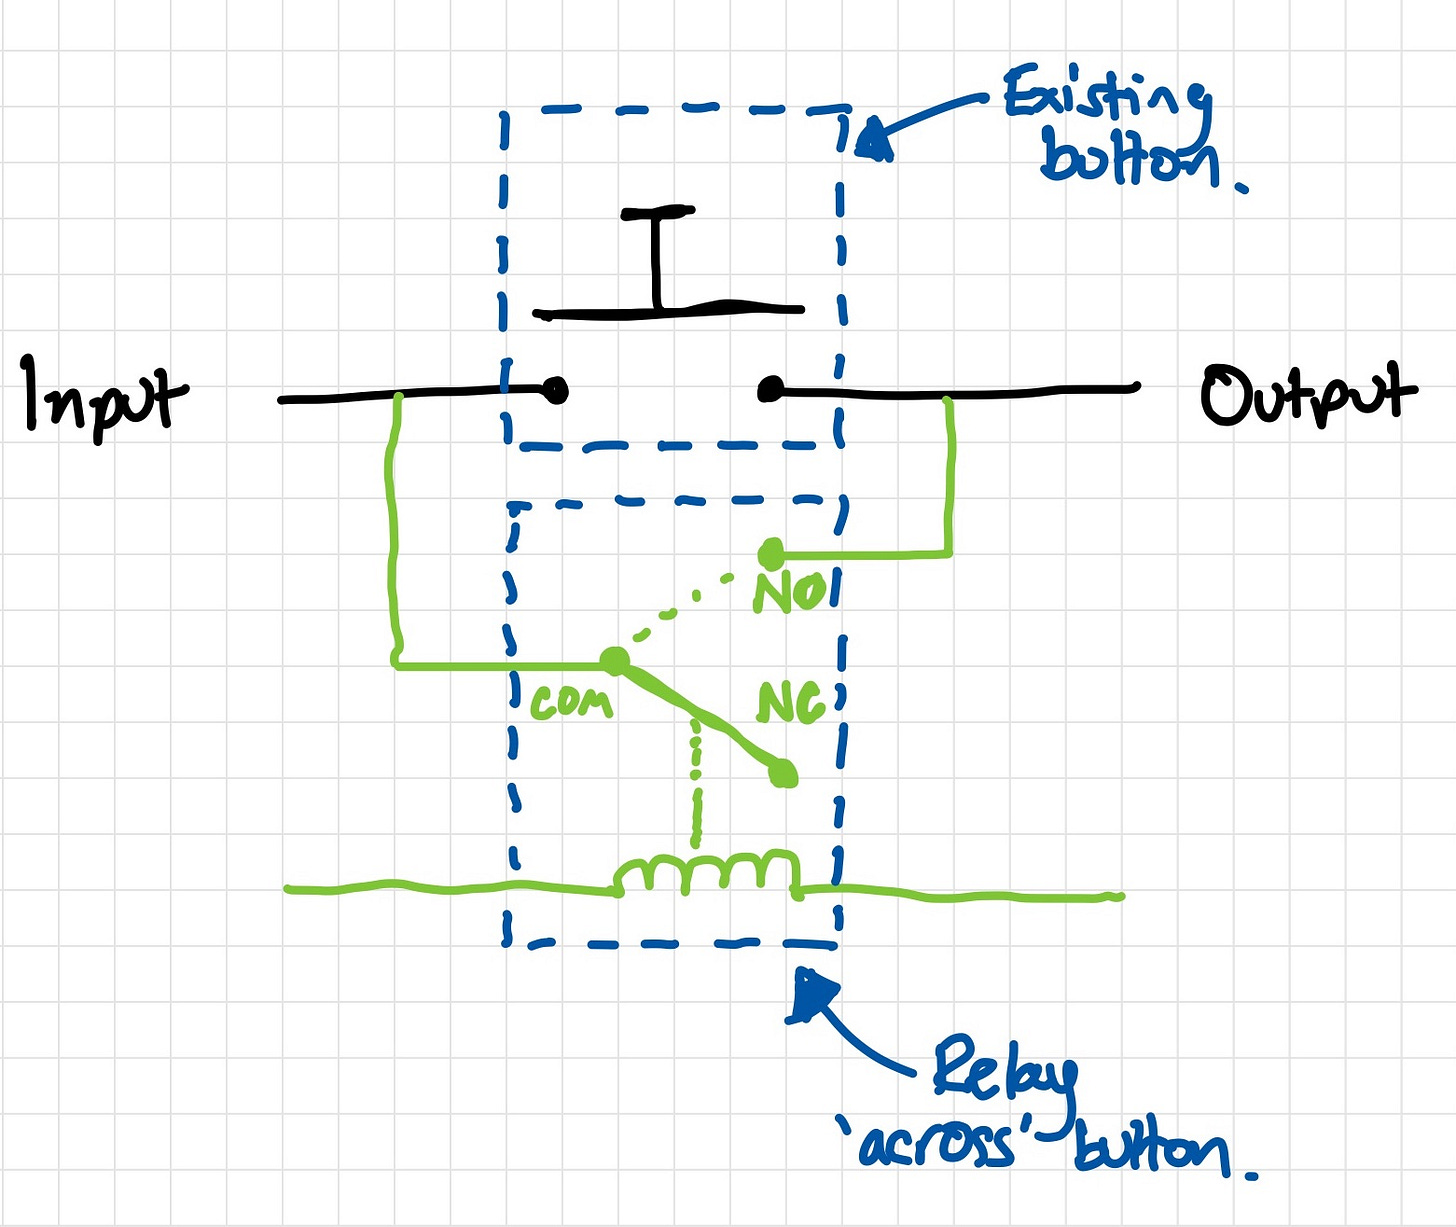
The reason why earlier I suggested to look for opportunities with mechanical, momentary switches, is that it’s really easy to replicate that behaviour using a relay, which we can then control from a microcontroller of our own. A momentary push button switch (or push-to-make switch) simply connects an input with an output for the duration of the press, allowing current to flow.
We can automate this by connecting a relay ‘across’ the switch. That is to say the relay ‘bridges’ the switch, such that either one of the switch or relay can make the connection between the input and the output. That way your modifications are backwards compatible and the standard buttons can still be used.
The above diagram details the basic idea of what we want to achieve. There are considerations we need to make when working with relays (such as protecting against back-EMF with a diode, and ensuring we have enough current capacity to drive the coil), but fortunately there are now cheaply available boards which handle all this and can connect directly to a microcontroller.
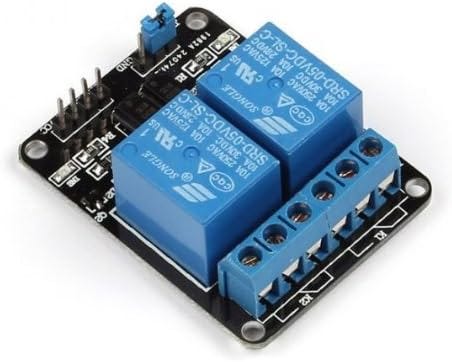
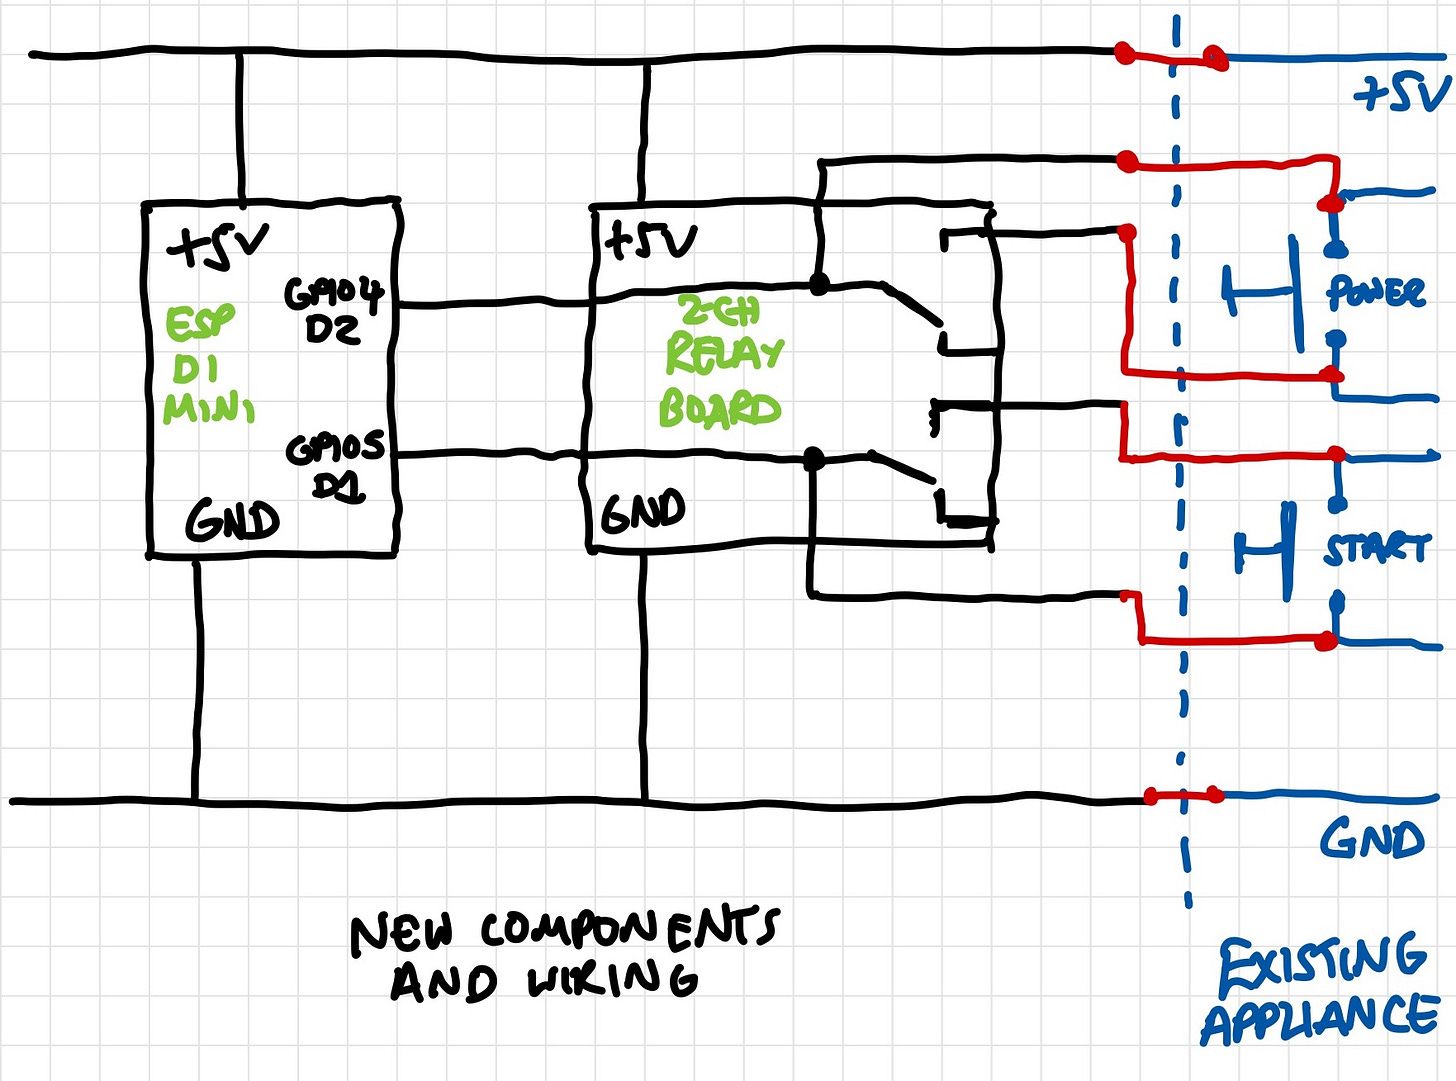
In the example of my dishwasher, it has 4 buttons but I only need to automate two of them. Since the default programme is already selected when the thing is powered up, I only need to be able to push the power/wake button, and then push the programme start button. With a 2-channel relay board, I can connect to each.
Connection and control
Next up, now that we have some relays connected to the buttons we want to press, we need to figure out how to trigger those relays. We’ve set ourselves up so that a simple digital logic output will energise the relay and press the button, but how do we create that output. We need some kind of programmable microcontroller with WiFi, and that’s where ESP8266 devices come in. These modules are incredibly cheap, provide a handful of digital outputs, and come with a WiFi interface.
The number and type of outputs you need will dictate the types of board you can use. In this case we only need 2 digital outputs, so almost any ESP8266 or ESP32 board will work. I chose the D1 mini and simply stuck it into a spare spot behind the front panel using hot glue, along with the relay board.
This is the wiring diagram I ended up with:
You’ll note that I used the ‘NO’ or ‘Normally open’ connections to the relay. This means that the button is not pressed unless we tell it otherwise.
This is what it actually looked like installed:
And here’s what it looks like now everything is back together:
We then need some software to run here that will enable us to control the two digital outputs (and thus the relays) via Home Assistant, since of course we want to integrate the appliance and be able to control it based on everything else in the house, not have a completely standalone (but connected) thing. That’s where ESPHome comes in. On a fundamental level, it’s a firmware that you can flash onto an ESP device that then allows you to control the inputs/outputs without having to code anything manually.
I won’t cover the installation process for ESPHome on the D1 mini here since there are plenty of guides to do that using Home Assistant or the command line already online. The premise is that ESPHome provides an interface for Home Assistant to connect to the relays. Something to be aware of is that the labels on the board don’t always match the names of the interfaces in ESPHome, but there’s great documentation to help there.
Here’s my ESPHome configuration file:
esphome:
  name: dishwasher
  platform: ESP8266
  board: d1_mini

wifi:
  ssid: "my wifi network"
  password: "mysecurepasswordlol"

  # Enable fallback hotspot (captive portal) in case wifi connection fails
  ap:
    ssid: "Dishwasher Fallback Hotspot"
    password: ""

captive_portal:

# Enable logging
logger:

# Enable Home Assistant API
api:
  password: 'redacted'

ota:
  password: 'redacted'

switch:
  - platform: gpio
    name: "Power on and start button"
    pin: GPIO4
    inverted: true
    id: poweron
    on_turn_on:
    - delay: 500ms
    - switch.turn_off: poweron
    - delay: 500ms
    - switch.turn_on: start
  - platform: gpio
    id: start
    internal: True
    pin: GPIO5
    inverted: true
    on_turn_on:
    - delay: 500ms
    - switch.turn_off: start
If you look closely at the above code block, you’ll see I’ve added some logic in here, under the ‘switch’ heading. Since we know that we need to press the power button and then shortly after press the programme start button, I set it up to do this here rather than do it later in Home Assistant.
It’s essentially setting up a switch that when pressed, will turn itself back off again after a 500ms delay, then after a further 500ms will turn on a second (hidden, internal only) switch that will turn itself off again after a 500ms delay.
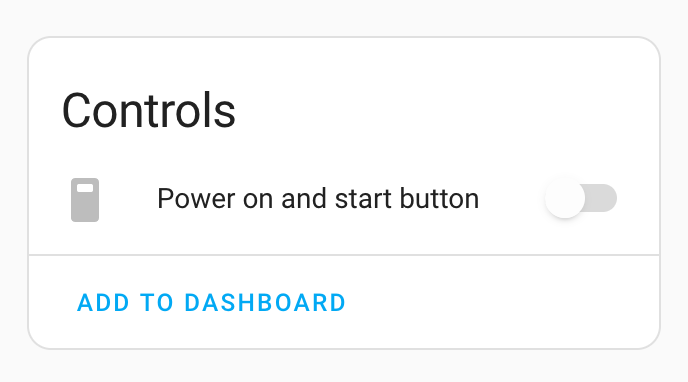
When all said and done this then presents in Home Assistant as a switch that you turn on, which will trigger the dishwasher to start - pretty cool!
A great upside with this particular appliance is that it just ignores the button press for programme start if the door is open (as you’d expect). This is a graceful fallback that means we don’t even need to do any checks to make sure it’s OK to start the wash, and gives a simple control for the user of the appliance: if you want it to run, shut the door, otherwise leave it open.
Starting from power on
One drawback of the simple, relay-driven-button approach to appliance automation, is that there is no feedback from the appliance. For example we can know that we pressed the power and programme start buttons, but did the power actually come on and did the programme start? Admittedly, we’re not doing life-changing stuff here, and if the dishes don’t get washed it’s not the end of the world, but in some cases feedback could be very important.
A way to mitigate some of the risk here is to always start from a known position. For example, we can say that whenever we are done we turn the appliance off, and when we want to interact with the appliance we first have to turn it on, effectively resetting everything. That way if the automation did get into an unknown state whilst we have no feedback to confirm, we can go back to a known state simply by powering the device off and back on again.
A simple way to achieve this is via the use of connected plugs. We’ve talked about those before on this blog, and my preference (at the moment) is the TP-Link Kasa KP115, since it also has energy monitoring. A connected plug for the appliance also affords you the opportunity to fully turn it off when you’re not using it.
Automation
After all that work to hack the appliance and get it connected to Home Assistant, now comes the fun part, the automations!
Since we can now trigger the dishwasher to run whenever we want, we can simply add an automation that triggers it every night at 2AM. We know the dishwasher won’t run if the door hasn’t been closed so if we want it to run we can just put the detergent in and close the door before going to bed. The next morning everything is clean and ready to unload without having to think about it. That’s a bit boring though.
Given what I talked about in ICYMI: Alternative energy providers are a thing, you know that it’s possible to have an energy provider that tells you in advance about 30 minute rates for electricity. Using the awesome Octopus Energy add-on for Home Assistant combined with the knowledge of how long the dishwasher takes to run, we can set up an automation triggered by a target rate sensor that will start the dishwasher at the pre-determined cheapest time of the night.
alias: "[Cleaning] Automate Dishwasher"
description: ""
trigger:
  - platform: state
    entity_id: binary_sensor.octopus_energy_target_dishwasher_target
    to: "on"
action:
  - service: switch.turn_on
    entity_id: switch.dishwasher_plug
  - delay: "00:03:00"
  - service: switch.turn_on
    entity_id: switch.power_on_and_start_button
  - delay: "04:00:00"
  - service: switch.turn_off
    entity_id: switch.dishwasher_plug
mode: restart
How well does it work?
It works incredibly well. We’ve taken an appliance from being entirely unconnected to one that knows exactly when the best time of day to run is for the cheapest electricity, powers on and starts automatically, and then powers off again when it’s done. For me this is the definition of a smart home - I don’t need to manually keep an eye on it or switch things on and off, I just put dishes and detergent in and shut the door, then come back later knowing that it’s done it’s work at the most efficient time to do so. I also, thanks to the connected plug, know how much energy it uses over time and how much it costs.
Even though I’m still manually putting in dishes and detergent and then taking clean dishes out again, there’s still a massive sense of satisfaction to know it just does it’s thing at the best time of night when I’m asleep without having to tell it to do so.
Phew! That was a long one. Are you thinking about giving this sort of thing a try? Did I miss anything? Is there anything I could have explained better? Either way, let me know your thoughts down in the comments! See you on the next one.


